CCIE Voice Lab 1.12 Tasks
1. Configure UCCX to work with CUCM using the following parameters:
a. CUCM AXL Username: use your CUCM Admin username and password
b. Cisco Unified CM Telephony Provider Configuration, User Prefix: uccxcti; create a password
c. RmCm Provider Configuration, User ID: uccxrmcm; create a password
d. NTP Server: NY VGWY
e. Number of HR session licenses: 3
f. Recording Count: 6
g. Number of Outbound seats: 6
h. Codec: G711
i. Cisco Unified CCX Administrator: Ari Gold (agold) and David Wright (dwright).
j. Use CTI Ports/DNs beginning with 1201.
2. Configure the auto attendant script to answer calls when a call arrives at 1300. However, when callers hit the AA, they should be greeted with “Welcome to Ballplayers LLC” followed by the default welcome AA. Do not modify the existing AA.
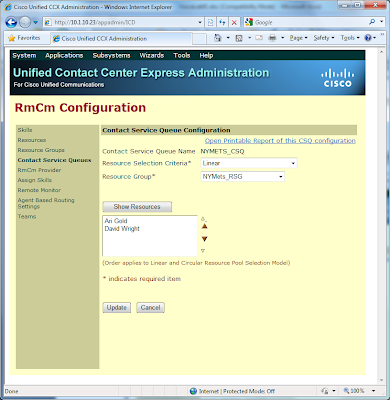
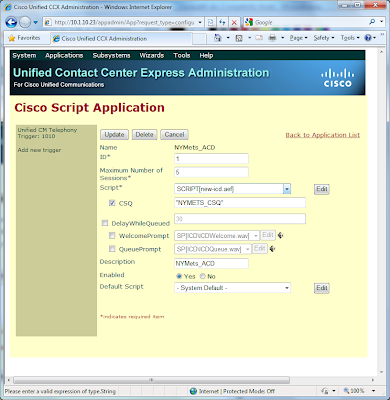
3. Configure an NY Mets ACD Queue that will be triggered when dialing extension 1010. When callers dial 1010, they should be greeted with “Welcome to Ballplayers LLC” followed by the default prompt. Ari Gold should have a new UCCX DN 1011; David Wright should have a new UCCX DN 1012. Ari should also take the call first, unless he is busy. Caller should hear Music On Hold while sitting in queue.
4. Ari and David should be able to log into ACD service from their phone without typing a username and password. Both should be in a ready state once he has selected the “Ready” softkey and remain ready as long has he hasn’t either logged out or selected the “not ready” softkey.
CCIE Voice Lab 1.12 Solutions
The CCIE Lab is notorious for wording task in such a way to as either “confuse” or trip up the test taker (at least this was the case when I took my Route/Switch lab). I’ve worded the tasks in Lab 1.12 to makes the student think about all of the tasks in this lab. For example, just because a particular task comes later, that doesn’t necessarily mean that the test taker must complete those tasks in that particular order.
Also note, the Administration Guide for Cisco Unified CCX and Cisco Unified IP IVR, Release 7.0(1) is only available on CCO as a PDF document. Therefore, I will refer to specific chapters during my explanations below.
 Next, I add the 1011 and 1012 lines to Ari and David phones, respectively. Finally, under User Management > End User, I associate these new DNs with both Ari and David as their IPCC Extension. See Guidelines for Configuring Agent Phones, page 4-16 of the Administration Guide for Cisco Unified CCX and Cisco Unified IP IVR, Release 7.0(1) for further details.

2. Before we can begin configuring either the AA or ACD, UCCX requires some basic setup. When logging into UCCX the first time, a setup wizard launches. During this wizard, you are prompted to provide the following configuration parameters:
AXL Username: Administrator
Password:
Installation of License
Cisco Unified CM Telephony Provider Configuration, User Prefix: uccxcti; create a password
RmCm Provider Configuration, User ID: uccxrmcm; create a password
NTP Server: NY VGWY
Number of HR session licenses: 3
Recording Count: 6
Number of Outbound seats: 6
Codec: G711
User Configuration: Ari Gold (UCCX Administrator) and David Wright.

For additional information and details, refer to Provisioning Unified CM Telephony Subsystem, page 6-5 of the Administration Guide for Cisco Unified CCX and Cisco Unified IP IVR, Release 7.0(1).

You can verify that the CTI ports are registered with UC Manager under Device > Phone.

3. There are a few things we need to do in order to work with the default AA script. First, record your prompt per the task. Refer to Recording and Uploading Prompt Files, page 10-12 of the Administration Guide for Cisco Unified CCX and Cisco Unified IP IVR, Release 7.0(1) for instructions on using the Microsoft Windows Sound Recorder in Windows XP. Then, upload your prompt in Applications > Prompt Management.

To configure the new AA script, go to Application > Application Management > Add a New Application. From the Add a New Application > Application Type drop-down, select Cisco Script Application, then next. Provide the necessary information for the Cisco Script Application and select Add.

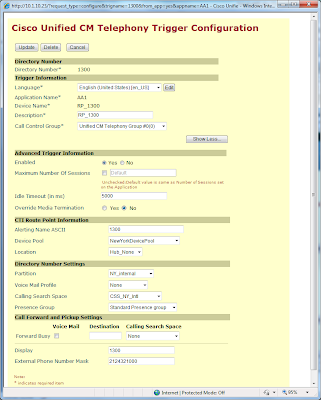
Lastly, we need to add a Trigger for this script. Under the Trigger Type drop down, select “Unified CM Telephony Trigger”. Then, provide the necessary Trigger Configuration information, and Add. At this point, you should be able to dial 1300, whereupon you will hear your custom prompt followed by the standard AA.
Refer to the Configuring Script Applications, page 9-3 of the Administration Guide for Cisco Unified CCX and Cisco Unified IP IVR, Release 7.0(1) for additional information and guidance.

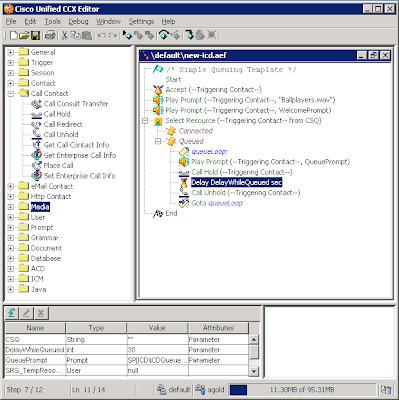
Configuring the ACD follows a similar process. Once again, launch the Cisco Unified CCX Editor. This time, open the ICD template under File > Open > C: > Program Files > wfavvid > Scripts > Template > Queuing > Simple Queuing.aef. As before, add a new “Play Prompt” step prior to the first one. However, in order for a call to hear MOH, you must add a Call Hold step and Call Unhold step before and after “Delay DelayedWhileQueued sec”. Verify the script and then save it in the Script Repository > Default.
5. Since UCCX Extensions have already been associated with users, there are two primary tasks left for configuring the NY Mets ACD queue; creating/modifying a script and then setting up another Cisco Script Applications.
Once again, open the Cisco Unified CCX Editor, and select the ICD template. As with the AA script, modify the ICD script to include your custom welcome message. Next, in order for callers to hear MOH while in queue, you must add the “Call Hold” and “Call Unhold” steps to the queueLoop.
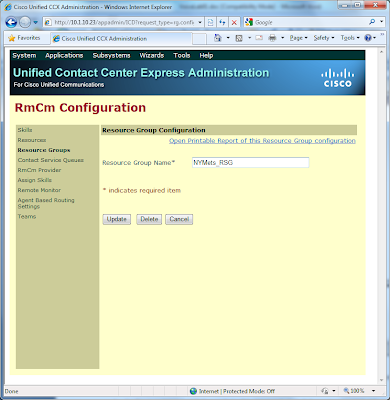
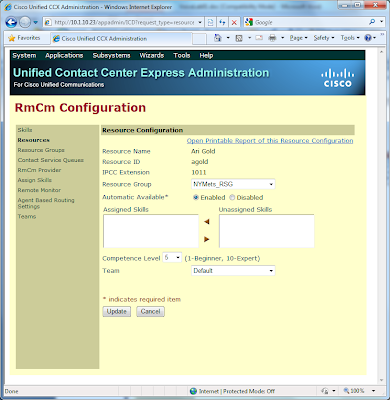
Next, in UCCX, go to Subsytems > RmCm and configure a Resource Group and assign the users to that Resource Group. Then, configure your CSQ, Script Applications, and Trigger.
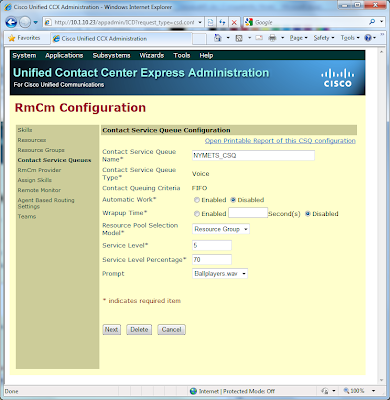
6. The last task involves the configuration of Cisco IP Phone Agent and a few system tweaks. You’ll notice that during the CSQ configuration, Automatic Work is disabled by default, which is what we want. Then, under system parameters, change the value of “Agent State after Ring No Answer*” from the default Ready to Not Ready.
To have Ari and David login into IP Phone Agent (IPPA), refer to the Configure a "One Button Login" for IP Phone Agents example on CCO.

Next, in UCCX, go to Subsytems > RmCm and configure a Resource Group and assign the users to that Resource Group. Then, configure your CSQ, Script Applications, and Trigger.


