First, my apologies for not having posted an update in quite some time. It has been an extremely busy three months for me professionally…
A business leader at GE once told me that “The only constant in the business world is change. If one is afraid of change, then he should find a new career.”
Since my previous post, I have transitioned into an Account Manager role here at World Wide Technology. My new responsibilities will be to support the United States Department of Homeland Security (DHS). Prior to my new role, I was supporting DHS as a Presales SE. My predecessor Account Manager, with whom I had a great working relationship and a great deal of respect for, decided to leave WWT to pursue a professional opportunity with Cisco. Given the circumstances, I felt this was an excellent opportunity to try something new in my career, leveraging my existing technical skills. Only time will tell with regards to whether this was a smart career move, but I am excited about my new responsibilities, as well as supporting the mission of DHS.
As for this blog, at the very least, I will continue to keep the legacy postings online. However, given that I no longer plan to pursue a CCIE Voice, I will no longer continue with any new lab postings. Moving forward, I may utilize this space to post observations as well as general insights relating to the IT products, solutions, and services that WWT provides to its customers.
Finally, I’d like to thank everyone who has enjoyed my postings and has shared comments, feedback, and/or suggestions over the past 2+ years. I wish everyone the best of luck in their CCIE pursuits and professional endeavors.
Monday, August 9, 2010

Tuesday, May 4, 2010
Comments on Cisco’s Tandberg Acquisition
In case you haven’t been following, Cisco completed its acquisition of Tandberg on April 18. By coincidence, I was attending a Tandberg training class at their Reston, VA facility on the first official day of the marriage. There was certainly an atmosphere of excitement in the area during that week.
I had been vaguely familiar with the Tandberg product line prior to my training. At the conclusion of that week of class, it became varies obvious why Cisco choose to pursue this acquisition – Tandberg’s VTC products rock! Tandberg’s impressive offerings include a software video MOVI client, various desktop units, room based solutions, and a Telepresence offering that is absolutely incredible. Their management GUIs are extremely intuitive and I look forward to many of those features being integrated into Cisco’s UC product portfolio (awesome troubleshooting tools!).
As a leading Cisco Gold Partner, I am very excited about this new set of solutions that I can now offer my customers. One of my DOD customers has told me that the word “Tandberg” is often treated as both a verb and a noun and is synonymous to VTC (e.g.: “Please Tandberg me to the Deputy Director”). There will undoubtedly be some kinks in the weeks and months ahead in terms of integrating the product line into Cisco’s UC portfolio. However, this acquisition certainly reinforces John Chamber’s belief that Video Is the next Killer App, as discussed during the 2009 Networkers Conference.
Friday, March 19, 2010
CCIE Voice Lab 1.12 – UCCX
We will configure Cisco Unified Contact Center Express in Lab 1.12.
CCIE Voice Lab 1.12 Tasks
1. Configure UCCX to work with CUCM using the following parameters:
a. CUCM AXL Username: use your CUCM Admin username and password
b. Cisco Unified CM Telephony Provider Configuration, User Prefix: uccxcti; create a password
c. RmCm Provider Configuration, User ID: uccxrmcm; create a password
d. NTP Server: NY VGWY
e. Number of HR session licenses: 3
f. Recording Count: 6
g. Number of Outbound seats: 6
h. Codec: G711
i. Cisco Unified CCX Administrator: Ari Gold (agold) and David Wright (dwright).
j. Use CTI Ports/DNs beginning with 1201.
2. Configure the auto attendant script to answer calls when a call arrives at 1300. However, when callers hit the AA, they should be greeted with “Welcome to Ballplayers LLC” followed by the default welcome AA. Do not modify the existing AA.
3. Configure an NY Mets ACD Queue that will be triggered when dialing extension 1010. When callers dial 1010, they should be greeted with “Welcome to Ballplayers LLC” followed by the default prompt. Ari Gold should have a new UCCX DN 1011; David Wright should have a new UCCX DN 1012. Ari should also take the call first, unless he is busy. Caller should hear Music On Hold while sitting in queue.
4. Ari and David should be able to log into ACD service from their phone without typing a username and password. Both should be in a ready state once he has selected the “Ready” softkey and remain ready as long has he hasn’t either logged out or selected the “not ready” softkey.
CCIE Voice Lab 1.12 Solutions
The CCIE Lab is notorious for wording task in such a way to as either “confuse” or trip up the test taker (at least this was the case when I took my Route/Switch lab). I’ve worded the tasks in Lab 1.12 to makes the student think about all of the tasks in this lab. For example, just because a particular task comes later, that doesn’t necessarily mean that the test taker must complete those tasks in that particular order.
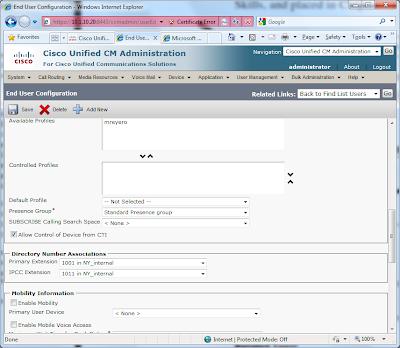
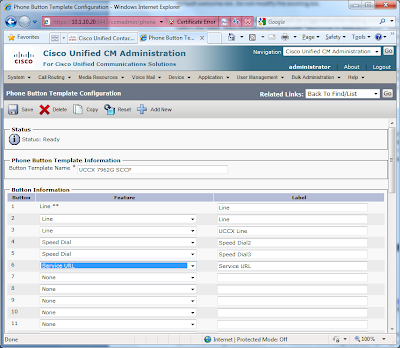 Next, I add the 1011 and 1012 lines to Ari and David phones, respectively. Finally, under User Management > End User, I associate these new DNs with both Ari and David as their IPCC Extension. See Guidelines for Configuring Agent Phones, page 4-16 of the Administration Guide for Cisco Unified CCX and Cisco Unified IP IVR, Release 7.0(1) for further details.
2. Before we can begin configuring either the AA or ACD, UCCX requires some basic setup. When logging into UCCX the first time, a setup wizard launches. During this wizard, you are prompted to provide the following configuration parameters:
UC Manager IP address: 10.1.10.20
AXL Username: Administrator
Password:
Installation of License
Cisco Unified CM Telephony Provider Configuration, User Prefix: uccxcti; create a password
RmCm Provider Configuration, User ID: uccxrmcm; create a password
NTP Server: NY VGWY
Number of HR session licenses: 3
Recording Count: 6
Number of Outbound seats: 6
Codec: G711
User Configuration: Ari Gold (UCCX Administrator) and David Wright.
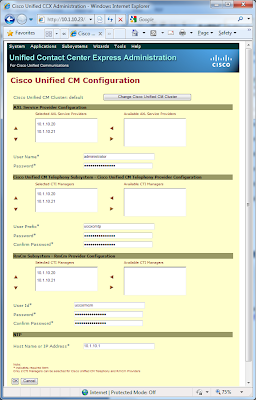
For additional information and details, refer to Provisioning Unified CM Telephony Subsystem, page 6-5 of the Administration Guide for Cisco Unified CCX and Cisco Unified IP IVR, Release 7.0(1).
Next, configure the Cisco Unified CM Telephony Call Control Group under Subsystems > Cisco Unified CM Telephony. See Adding a New Unified CM Telephony Call Control Group, page 6-9 of the Administration Guide for Cisco Unified CCX and Cisco Unified IP IVR, Release 7.0(1).
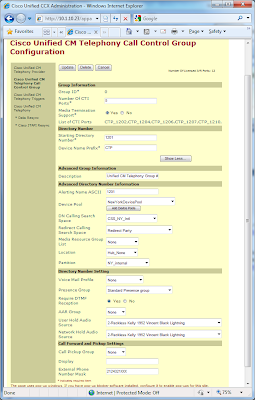
You can verify that the CTI ports are registered with UC Manager under Device > Phone.
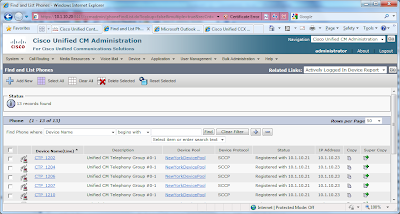
3. There are a few things we need to do in order to work with the default AA script. First, record your prompt per the task. Refer to Recording and Uploading Prompt Files, page 10-12 of the Administration Guide for Cisco Unified CCX and Cisco Unified IP IVR, Release 7.0(1) for instructions on using the Microsoft Windows Sound Recorder in Windows XP. Then, upload your prompt in Applications > Prompt Management.
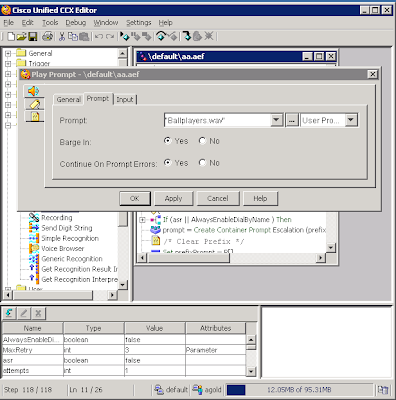
Next, launch your Cisco Unified CCX Editor. Open the Auto Attendant template under File > Open > C: > Program Files > wfavvid > Scripts > Template > IVR > Auto Attendant.aef. On the left side of the editor, expand the Media Folder and drag “Play Prompt” in front of the existing “Play Prompt” in the script. Then, right-click this new prompt and select “Properties”. In the “Prompt” option tab, type the name of your Prompt in “quotations”. Verify the script and then save it in the Script Repository > Default.
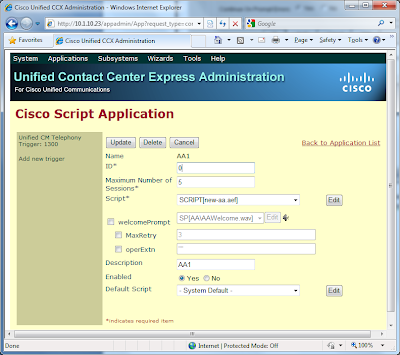
To configure the new AA script, go to Application > Application Management > Add a New Application. From the Add a New Application > Application Type drop-down, select Cisco Script Application, then next. Provide the necessary information for the Cisco Script Application and select Add.
CCIE Voice Lab 1.12 Tasks
1. Configure UCCX to work with CUCM using the following parameters:
a. CUCM AXL Username: use your CUCM Admin username and password
b. Cisco Unified CM Telephony Provider Configuration, User Prefix: uccxcti; create a password
c. RmCm Provider Configuration, User ID: uccxrmcm; create a password
d. NTP Server: NY VGWY
e. Number of HR session licenses: 3
f. Recording Count: 6
g. Number of Outbound seats: 6
h. Codec: G711
i. Cisco Unified CCX Administrator: Ari Gold (agold) and David Wright (dwright).
j. Use CTI Ports/DNs beginning with 1201.
2. Configure the auto attendant script to answer calls when a call arrives at 1300. However, when callers hit the AA, they should be greeted with “Welcome to Ballplayers LLC” followed by the default welcome AA. Do not modify the existing AA.
3. Configure an NY Mets ACD Queue that will be triggered when dialing extension 1010. When callers dial 1010, they should be greeted with “Welcome to Ballplayers LLC” followed by the default prompt. Ari Gold should have a new UCCX DN 1011; David Wright should have a new UCCX DN 1012. Ari should also take the call first, unless he is busy. Caller should hear Music On Hold while sitting in queue.
4. Ari and David should be able to log into ACD service from their phone without typing a username and password. Both should be in a ready state once he has selected the “Ready” softkey and remain ready as long has he hasn’t either logged out or selected the “not ready” softkey.
CCIE Voice Lab 1.12 Solutions
The CCIE Lab is notorious for wording task in such a way to as either “confuse” or trip up the test taker (at least this was the case when I took my Route/Switch lab). I’ve worded the tasks in Lab 1.12 to makes the student think about all of the tasks in this lab. For example, just because a particular task comes later, that doesn’t necessarily mean that the test taker must complete those tasks in that particular order.
Also note, the Administration Guide for Cisco Unified CCX and Cisco Unified IP IVR, Release 7.0(1) is only available on CCO as a PDF document. Therefore, I will refer to specific chapters during my explanations below.
 Next, I add the 1011 and 1012 lines to Ari and David phones, respectively. Finally, under User Management > End User, I associate these new DNs with both Ari and David as their IPCC Extension. See Guidelines for Configuring Agent Phones, page 4-16 of the Administration Guide for Cisco Unified CCX and Cisco Unified IP IVR, Release 7.0(1) for further details.

2. Before we can begin configuring either the AA or ACD, UCCX requires some basic setup. When logging into UCCX the first time, a setup wizard launches. During this wizard, you are prompted to provide the following configuration parameters:
AXL Username: Administrator
Password:
Installation of License
Cisco Unified CM Telephony Provider Configuration, User Prefix: uccxcti; create a password
RmCm Provider Configuration, User ID: uccxrmcm; create a password
NTP Server: NY VGWY
Number of HR session licenses: 3
Recording Count: 6
Number of Outbound seats: 6
Codec: G711
User Configuration: Ari Gold (UCCX Administrator) and David Wright.

For additional information and details, refer to Provisioning Unified CM Telephony Subsystem, page 6-5 of the Administration Guide for Cisco Unified CCX and Cisco Unified IP IVR, Release 7.0(1).

You can verify that the CTI ports are registered with UC Manager under Device > Phone.

3. There are a few things we need to do in order to work with the default AA script. First, record your prompt per the task. Refer to Recording and Uploading Prompt Files, page 10-12 of the Administration Guide for Cisco Unified CCX and Cisco Unified IP IVR, Release 7.0(1) for instructions on using the Microsoft Windows Sound Recorder in Windows XP. Then, upload your prompt in Applications > Prompt Management.

To configure the new AA script, go to Application > Application Management > Add a New Application. From the Add a New Application > Application Type drop-down, select Cisco Script Application, then next. Provide the necessary information for the Cisco Script Application and select Add.

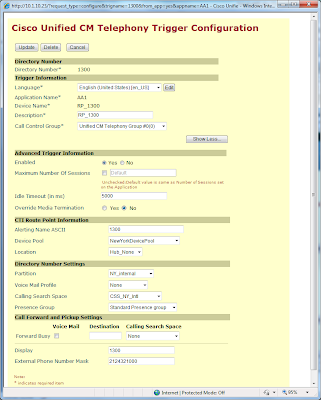
Lastly, we need to add a Trigger for this script. Under the Trigger Type drop down, select “Unified CM Telephony Trigger”. Then, provide the necessary Trigger Configuration information, and Add. At this point, you should be able to dial 1300, whereupon you will hear your custom prompt followed by the standard AA.
Refer to the Configuring Script Applications, page 9-3 of the Administration Guide for Cisco Unified CCX and Cisco Unified IP IVR, Release 7.0(1) for additional information and guidance.

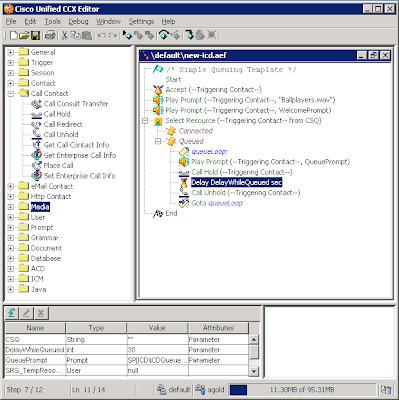
Configuring the ACD follows a similar process. Once again, launch the Cisco Unified CCX Editor. This time, open the ICD template under File > Open > C: > Program Files > wfavvid > Scripts > Template > Queuing > Simple Queuing.aef. As before, add a new “Play Prompt” step prior to the first one. However, in order for a call to hear MOH, you must add a Call Hold step and Call Unhold step before and after “Delay DelayedWhileQueued sec”. Verify the script and then save it in the Script Repository > Default.
5. Since UCCX Extensions have already been associated with users, there are two primary tasks left for configuring the NY Mets ACD queue; creating/modifying a script and then setting up another Cisco Script Applications.
Once again, open the Cisco Unified CCX Editor, and select the ICD template. As with the AA script, modify the ICD script to include your custom welcome message. Next, in order for callers to hear MOH while in queue, you must add the “Call Hold” and “Call Unhold” steps to the queueLoop.
Next, in UCCX, go to Subsytems > RmCm and configure a Resource Group and assign the users to that Resource Group. Then, configure your CSQ, Script Applications, and Trigger.
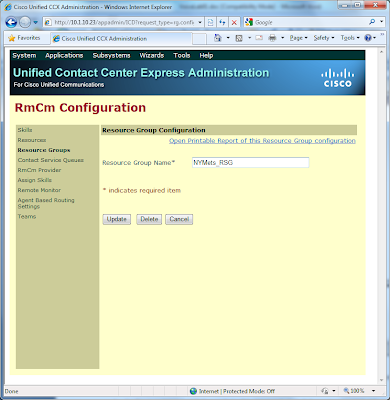
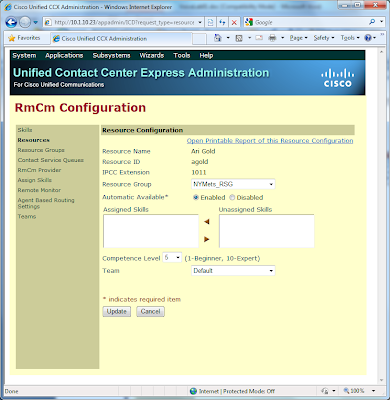
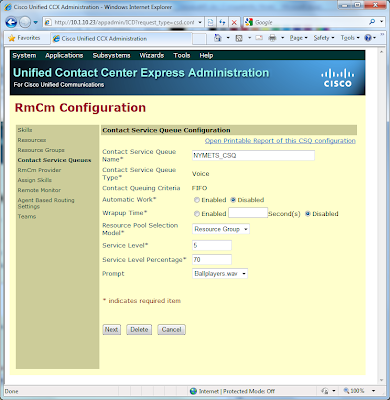
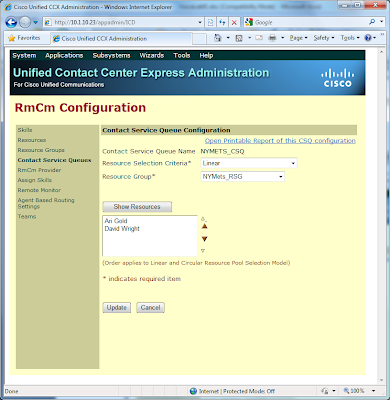
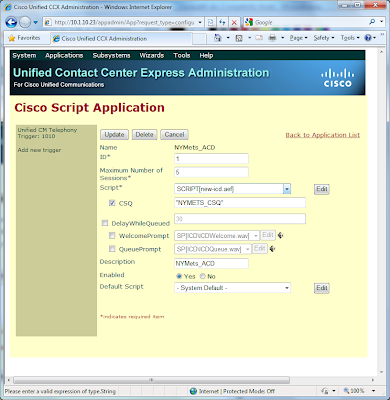
6. The last task involves the configuration of Cisco IP Phone Agent and a few system tweaks. You’ll notice that during the CSQ configuration, Automatic Work is disabled by default, which is what we want. Then, under system parameters, change the value of “Agent State after Ring No Answer*” from the default Ready to Not Ready.
To have Ari and David login into IP Phone Agent (IPPA), refer to the Configure a "One Button Login" for IP Phone Agents example on CCO.

Next, in UCCX, go to Subsytems > RmCm and configure a Resource Group and assign the users to that Resource Group. Then, configure your CSQ, Script Applications, and Trigger.


Monday, February 8, 2010
CCIE Voice Lab 1.11 – Unity Connection and CUE
In CCIE Voice Lab 1.11, the New York, Los Angeles, and London locations will be configured to support voice messaging and associated components.
CCIE Voice Lab 1.11 Tasks
1. Configure Cisco Unity Connection (CUC) integration with CUCM. You must integrate using SCCP. Use pilot 1170, directory number 1171 and 1172, and 1180 for MWI-on and 1181 for MWI-off.
2. Configure Unity Connection voicemail for all users in New York and Los Angeles. Users must be imported from CUCM. Ensure that the users in the directory are listed last name, first name. Accounts should be created with the following requirements:
a. No Limit for Failed Logons
b. Credential Never Expires
c. Minimum Credential Length: 5
d. Stored Number of Previous Credentials: 0
e. No Check for Trivial Passwords
f. User must be prevented from sending Broadcast Messages to Users
3. Configure an Auto Attendant for NY with DN 1000. Configure the AA so that when users press “0” they are routed to Ari Gold at ext. 1001. Business hours are 8AM – 6PM EST/EDT. Customize the greeting as follows:
a. Allow callers to press “4” to use the phone keypad to spell all or part of the last then first name of the Connection user that they want to reach.
b. At the end of the greetings, users should be sent to a Directory Handler. If a Caller Exits, he/she should be sent back to the NY Opening Greeting. If a caller provides No Input, No Selection or Presses Zero, the call should be routed back to Ari Gold’s mailbox.
c. After hours messages should also be stored in Ari Gold’s mailbox.
4. Configure an Auto Attendant for LA with DN 2000. Configure the AA so that when users press “0” they are routed to Arliss Michaels at ext. 2001. Business hours are 8AM – 6PM PST/PDT. Customize the greeting as follows:
a. Allow callers to press “4” to use the phone keypad to spell all or part of the last then first name of the Connection user that they want to reach.
b. At the end of the greetings, users should be sent to a Directory Handler. If a Caller Exits, he/she should be sent back to the LA Opening Greeting. If a caller provides No Input, No Selection or Presses Zero, the call should be routed back to Arliss Michaels’s mailbox.
c. After hours messages should also be stored in Arliss Michaels’s mailbox.
5. Configure a second line appearance on Ari’s phone using *1001. When Ari’s primary extension is busy, calls should roll to this number, followed by voicemail. This line should be able to access voicemail in Ari’s mailbox.
6. London CUCME users should use their local CUE for voicemail, with the following parameters: pilot 3170; and 3180 for MWI-on and 3181 for MWI-off. Create mailboxes for Jerry Maguire and David Beckham with blank passwords and PINS.
7. Create an AA in London using ext 3000. Ensure that callers in NY and LA can reach the AA via VOIP as well as PSTN dialing.
CCIE Voice Lab 1.11 Solutions
1. The Cisco Unified Communications Manager SCCP Integration Guide for Cisco Unity Connection Release 7.x is an excellent document for describing the tasks required to integrate CUC with CUCM. I more or less used the examples and naming conventions provided in Programming the Cisco Unified CM Phone System for Integrating with Cisco Unity Connection section of the Setting Up a Cisco Unified Communications Manager 7.x SCCP Integration with Cisco Unity Connection chapter.
Below is screenshot of the final page of the Cisco Voicemail Port Wizard.

After the wizard finishes, configure the Hunt List and Hunt Pilot.Then, add the MWIs, Voice Mail Pilot Number for the Voice Mail Ports, and Voicemail Profile, per the instructions in Programming the Cisco Unified CM Phone System for Integrating with Cisco Unity Connection.
Now, proceed to Creating a New Integration with Cisco Unified Communications Manager. Do not forget to add your Pub as an AXL Server under the Phone System Configuration, as well as adding Unity Connection as an Application Server in CUCM.
2. To modify “No Limit for Failed Logons”, “Credential Never Expires”, “Minimum Credential Length: 5”, and “Stored Number of Previous Credentials: 0”, modify the default “Voice Mail Authentication Rule” under System Settings > Authentication Rules.
Looking ahead to the AA configuration, it would be wise to create a new schedule under Systems Settings > Schedules. Then, apply this new schedule to the Templates > User Templates > voicemailusertemplate.
Next, to ensure that users cannot send Broadcast Messages to Users on This Server, verify that “User Can Send Broadcast Messages to Users on This Server” is not-checked under Templates > User Templates > voicemailusertemplate > Send Message Settings.
Finally, you can import users from CUCM from Tools > Import Users. Be aware, users in CUCM must have their primary extension define. Visit Creating Multiple User Accounts from Cisco Unified Communications Manager Users for a good overview. Keep in mind that when you import your users, they will inherit the system Timezone. For your LA based users, you will need to modify their Timezone to PST.
3. Now we are ready to create the AA for both New York and Los Angeles. The process if almost identical. Basically, I create two now Call Handlers, “NY-Opening-Greeting” at extension 1000 and “LA-Opening-Greeting” at extension 2000. Edit the Greetings and Caller Input to match the task requirements. I then created to new Directory Handlers, one for NY and another for LA. I edit the Caller Input for each based on the task requirements.
4. Task 5 is relatively straight forward. Create a new Voice Mail Profile for the *1000 extension with a Voice Mail Box Mask of 1000; this strip the “*”. When you add the *1000 dn to Ari’s Phone, make sure that you use this Voice Mail Profile on this line appearance.
5. We now move on to CUE. Given that I covered CUE extensively in the CUCME-CUE Labs, so I will not recap the details here. However, I did run into an issue, which I haven’t fully yet fixed….
Because the SIP dial peer to the AA in London is not H323, it does not register with the gatekeeper. Therefore, I cannot dial 73000 from either NY or LA to hit the AA in London. I tried adding the e164 via the alias commands under gatekeeper. However, this is only a temporary fix and will not work in the actual lab. When you reboot either the gatekeeper (NY) or the CUCME router (London), the CUCME (London) will attempt to register using a random port. Since the alias command uses a static port (either 1719 or random, depending on how you initialing configuring), the RRQ from the gateway will be rejected (RRJ) by the Gatekeeper. I’ve spent a fair number of hours trying to find a work around, nothing has successfully worked. For now, I am moving on. If anyone finds a resolution, please share!
CCIE Voice Lab 1.11 Tasks
1. Configure Cisco Unity Connection (CUC) integration with CUCM. You must integrate using SCCP. Use pilot 1170, directory number 1171 and 1172, and 1180 for MWI-on and 1181 for MWI-off.
2. Configure Unity Connection voicemail for all users in New York and Los Angeles. Users must be imported from CUCM. Ensure that the users in the directory are listed last name, first name. Accounts should be created with the following requirements:
a. No Limit for Failed Logons
b. Credential Never Expires
c. Minimum Credential Length: 5
d. Stored Number of Previous Credentials: 0
e. No Check for Trivial Passwords
f. User must be prevented from sending Broadcast Messages to Users
3. Configure an Auto Attendant for NY with DN 1000. Configure the AA so that when users press “0” they are routed to Ari Gold at ext. 1001. Business hours are 8AM – 6PM EST/EDT. Customize the greeting as follows:
a. Allow callers to press “4” to use the phone keypad to spell all or part of the last then first name of the Connection user that they want to reach.
b. At the end of the greetings, users should be sent to a Directory Handler. If a Caller Exits, he/she should be sent back to the NY Opening Greeting. If a caller provides No Input, No Selection or Presses Zero, the call should be routed back to Ari Gold’s mailbox.
c. After hours messages should also be stored in Ari Gold’s mailbox.
4. Configure an Auto Attendant for LA with DN 2000. Configure the AA so that when users press “0” they are routed to Arliss Michaels at ext. 2001. Business hours are 8AM – 6PM PST/PDT. Customize the greeting as follows:
a. Allow callers to press “4” to use the phone keypad to spell all or part of the last then first name of the Connection user that they want to reach.
b. At the end of the greetings, users should be sent to a Directory Handler. If a Caller Exits, he/she should be sent back to the LA Opening Greeting. If a caller provides No Input, No Selection or Presses Zero, the call should be routed back to Arliss Michaels’s mailbox.
c. After hours messages should also be stored in Arliss Michaels’s mailbox.
5. Configure a second line appearance on Ari’s phone using *1001. When Ari’s primary extension is busy, calls should roll to this number, followed by voicemail. This line should be able to access voicemail in Ari’s mailbox.
6. London CUCME users should use their local CUE for voicemail, with the following parameters: pilot 3170; and 3180 for MWI-on and 3181 for MWI-off. Create mailboxes for Jerry Maguire and David Beckham with blank passwords and PINS.
7. Create an AA in London using ext 3000. Ensure that callers in NY and LA can reach the AA via VOIP as well as PSTN dialing.
CCIE Voice Lab 1.11 Solutions
1. The Cisco Unified Communications Manager SCCP Integration Guide for Cisco Unity Connection Release 7.x is an excellent document for describing the tasks required to integrate CUC with CUCM. I more or less used the examples and naming conventions provided in Programming the Cisco Unified CM Phone System for Integrating with Cisco Unity Connection section of the Setting Up a Cisco Unified Communications Manager 7.x SCCP Integration with Cisco Unity Connection chapter.
Below is screenshot of the final page of the Cisco Voicemail Port Wizard.

After the wizard finishes, configure the Hunt List and Hunt Pilot.Then, add the MWIs, Voice Mail Pilot Number for the Voice Mail Ports, and Voicemail Profile, per the instructions in Programming the Cisco Unified CM Phone System for Integrating with Cisco Unity Connection.
Now, proceed to Creating a New Integration with Cisco Unified Communications Manager. Do not forget to add your Pub as an AXL Server under the Phone System Configuration, as well as adding Unity Connection as an Application Server in CUCM.
2. To modify “No Limit for Failed Logons”, “Credential Never Expires”, “Minimum Credential Length: 5”, and “Stored Number of Previous Credentials: 0”, modify the default “Voice Mail Authentication Rule” under System Settings > Authentication Rules.
Looking ahead to the AA configuration, it would be wise to create a new schedule under Systems Settings > Schedules. Then, apply this new schedule to the Templates > User Templates > voicemailusertemplate.
Next, to ensure that users cannot send Broadcast Messages to Users on This Server, verify that “User Can Send Broadcast Messages to Users on This Server” is not-checked under Templates > User Templates > voicemailusertemplate > Send Message Settings.
Finally, you can import users from CUCM from Tools > Import Users. Be aware, users in CUCM must have their primary extension define. Visit Creating Multiple User Accounts from Cisco Unified Communications Manager Users for a good overview. Keep in mind that when you import your users, they will inherit the system Timezone. For your LA based users, you will need to modify their Timezone to PST.
3. Now we are ready to create the AA for both New York and Los Angeles. The process if almost identical. Basically, I create two now Call Handlers, “NY-Opening-Greeting” at extension 1000 and “LA-Opening-Greeting” at extension 2000. Edit the Greetings and Caller Input to match the task requirements. I then created to new Directory Handlers, one for NY and another for LA. I edit the Caller Input for each based on the task requirements.
4. Task 5 is relatively straight forward. Create a new Voice Mail Profile for the *1000 extension with a Voice Mail Box Mask of 1000; this strip the “*”. When you add the *1000 dn to Ari’s Phone, make sure that you use this Voice Mail Profile on this line appearance.
5. We now move on to CUE. Given that I covered CUE extensively in the CUCME-CUE Labs, so I will not recap the details here. However, I did run into an issue, which I haven’t fully yet fixed….
Because the SIP dial peer to the AA in London is not H323, it does not register with the gatekeeper. Therefore, I cannot dial 73000 from either NY or LA to hit the AA in London. I tried adding the e164 via the alias commands under gatekeeper. However, this is only a temporary fix and will not work in the actual lab. When you reboot either the gatekeeper (NY) or the CUCME router (London), the CUCME (London) will attempt to register using a random port. Since the alias command uses a static port (either 1719 or random, depending on how you initialing configuring), the RRQ from the gateway will be rejected (RRJ) by the Gatekeeper. I’ve spent a fair number of hours trying to find a work around, nothing has successfully worked. For now, I am moving on. If anyone finds a resolution, please share!
Monday, December 28, 2009
CCIE Voice Lab 1.10 – Quality of Service
Quality of Service (QoS) will be the focus CCIE Voice Lab 1.10.
CCIE Voice Lab 1.10 Tasks
1. Ensure that Skinny traffic from New York to Los Angeles is set to DSCP CS3. Any and all markings should be done by the endpoint whenever possible.
2. Limit SCCP traffic in both New York and Los Angeles to 30k per endpoint, and exceed traffic should be remarked to AF11.
3. Configure the frame relay link between New York and Los Angeles as if it is a full T1 (1536kpbs) link. Ensure that MLP FLI is enabled on the link. Lastly, configure the QoS as follows:
a. Voice media traffic should have a 30% priority of link bandwidth;
b. Voice signaling traffic should be given 5% of the link bandwidth;
c. All other traffic should be treated with weighted fair queuing.
4. Configure the frame relay link between New York and Los Angeles as if it is a half- T1 (768 kbps) link, with the following QoS parameters:
a. Voice media traffic should have a 192K of link bandwidth prioritized;
b. Voice signaling traffic should be given 38K of the link bandwidth;
c. All other traffic should be treated with weighted fair queuing.
5. Ensure that the New York VGWY, Los Angeles VGWY, and London CUCME send signaling and media traffic at DSCP CS3 and EF respectively.
CCIE Voice Lab 1.10 Solutions
1. By default, SCCP DSCP values are set at CS3 in the CUCM Enterprise Parameters.

CCIE Voice Lab 1.10 Tasks
1. Ensure that Skinny traffic from New York to Los Angeles is set to DSCP CS3. Any and all markings should be done by the endpoint whenever possible.
2. Limit SCCP traffic in both New York and Los Angeles to 30k per endpoint, and exceed traffic should be remarked to AF11.
3. Configure the frame relay link between New York and Los Angeles as if it is a full T1 (1536kpbs) link. Ensure that MLP FLI is enabled on the link. Lastly, configure the QoS as follows:
a. Voice media traffic should have a 30% priority of link bandwidth;
b. Voice signaling traffic should be given 5% of the link bandwidth;
c. All other traffic should be treated with weighted fair queuing.
4. Configure the frame relay link between New York and Los Angeles as if it is a half- T1 (768 kbps) link, with the following QoS parameters:
a. Voice media traffic should have a 192K of link bandwidth prioritized;
b. Voice signaling traffic should be given 38K of the link bandwidth;
c. All other traffic should be treated with weighted fair queuing.
5. Ensure that the New York VGWY, Los Angeles VGWY, and London CUCME send signaling and media traffic at DSCP CS3 and EF respectively.
CCIE Voice Lab 1.10 Solutions
1. By default, SCCP DSCP values are set at CS3 in the CUCM Enterprise Parameters.

Next, identical QoS policies are configured on both the New York and London switches (3750 and NME-16ES-1G-P, respectively). First, enable QoS globally, then define the policed DSCP remarking:
mls qos
mls qos map policed-dscp 24 to 10
Then, create the appropriate access-list to identify the SCCP traffic, following by the class-map to match the traffic, and finally, the QoS policy.
!
access-list 101 permit tcp any any eq 2000
!
class-map match-all SCCP
match access-group 101
!
!
policy-map MARK-SCCP
class SCCP
set dscp cs3
police 30000 8000 exceed-action policed-dscp-transmit
The final step is to create an inbound service-policy for the switchports that have IP phones.
interface FastEthernet1/0/8
description newyork phones
switchport access vlan 11
switchport voice vlan 12
spanning-tree portfast
service-policy input MARK-SCCP
2. The QoS and Traffic Shaping described in task 3 requires the creation Modular QoS CLI, a Virtual Template, and Frame Relay traffic shaping on both the New York and Los Angeles routers. Note, the configurations are identical on both routers, with the exception of the IP Addressing on both sides of the link. The first step it to create the QoS policy.
class-map match-all SIGNAL
match ip dscp cs3
class-map match-all RTP
match ip dscp ef
!
!
policy-map NY-LA-QOS
class RTP
priority percent 30
class SIGNAL
bandwidth percent 5
class class-default
fair-queue
Next, create the Virtual Templates for both New York and Los Angeles. Below is the New York side of the link.
!
interface Virtual-Template102
bandwidth 1536
ip address 172.16.1.1 255.255.255.252
ip ospf network point-to-point
ppp multilink
ppp multilink interleave
ppp multilink fragment delay 10
service-policy output NY-LA-QOS
!
Then, create the frame relay traffic shaping policy, and associate the Virtual Template with the Frame Relay sub-interface, and associate the frame relay traffic shaping policy.
!
map-class frame-relay FRTS-NY-LA
frame-relay cir 1536000
frame-relay bc 15360
frame-relay be 0
frame-relay mincir 1536000
!
interface Serial0/2/0
no ip address
encapsulation frame-relay
frame-relay traffic-shaping
frame-relay lmi-type cisco
!
interface Serial0/2/0.102 point-to-point
description frame relay link to Los Angeles
ip ospf network point-to-point
frame-relay interface-dlci 102 ppp Virtual-Template102
class FRTS-NY-LA
!
3. The QoS configuration between New York and London is slightly different, since the tasks do not instruct us to configure MLP LFI. For this link, the QoS policy-map is defined, reusing the previously configured class-maps. Then, a frame-relay traffic shaping policy is defined, with the QoS service-policy tied to it. Lastly, the FRTS policy is associated with the frame-relay sub-interfaces between New York and London.
!
policy-map NY-LNDN-QOS
class RTP
priority 192
class SIGNAL
bandwidth 38
class class-default
fair-queue
!
!
map-class frame-relay FRTS-NY-LNDN
frame-relay cir 768000
frame-relay bc 7680
frame-relay be 0
frame-relay mincir 768000
service-policy output NY-LNDN-QOS
!
!
interface Serial0/2/0.103 point-to-point
description frame relay link to London
ip address 172.16.1.5 255.255.255.252
ip ospf network point-to-point
frame-relay interface-dlci 103
class FRTS-NY-LNDN
!
4. By default, the MGCP and H323 gateways send media (RTP) marked as ef and signaling marked as af31.
To verify New York, first issue:
newyork#sh dial-peer voice 100 include DSCP
ip media DSCP = ef, ip media rsvp-pass DSCP = ef
ip media rsvp-fail DSCP = ef, ip signaling DSCP = cs3,
ip video rsvp-none DSCP = af41,ip video rsvp-pass DSCP = af41
ip video rsvp-fail DSCP = af41,
Then, modify the markings for each VOIPdDial-peer. Dial-peer 100 is shown below.
newyork(config)#dial-peer voice 100
newyork(config-dial-peer)#ip qos dscp cs3 signaling
In Los Angeles, verify by issuing a “show mgcp” to view the defaults.
losangeles#sh mgcp
!
To modify, issue
losangeles(config)#mgcp ip qos dscp ef media
losangeles(config)#mgcp ip qos dscp cs3 signaling
then verify
losangeles#sh mgcp
!
CUCME marks voice media traffic at DSCP value EF by default and voice signaling DSCP value CS3 by default. These parameters may be changed under the telephony-service CLI parameters. A “show telephony-service” in London verifies the values.
london#sh telephony-service
CONFIG (Version=7.1)
=====================
Version 7.1
Cisco Unified Communications Manager Express
For on-line documentation please see:
http://www.cisco.com/en/US/products/sw/voicesw/ps4625/tsd_products_support_series_home.html
ip source-address 10.1.32.1 port 2000
ip qos dscp:
ef (the MS 6 bits, 46, in ToS, 0xB8) for media
cs3 (the MS 6 bits, 24, in ToS, 0x60) for signal
af41 (the MS 6 bits, 34, in ToS, 0x88) for video
default (the MS 6 bits, 0, in ToS, 0x0) for serviceservice directed-
Subscribe to:
Posts (Atom)


